Showing posts with label DIY. Show all posts

Monday, June 25, 2012

PANDA NAILS!

2012-06-24 15.36.27

I decided to paint my nails with little panda faces after seeing this on Pinterest. 
Here is a short, not-very-descriptive tutorial on how to do it.

20120624_150942

2012-06-24 15.34.53

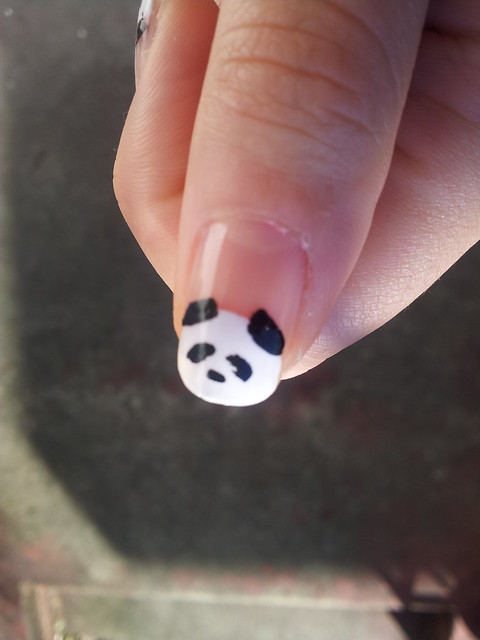
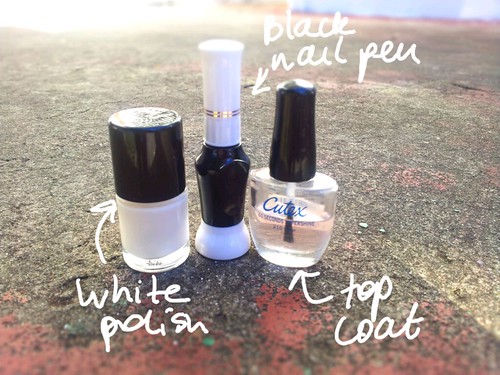
First, you need a white nail polish, a black nail art pen and top coat. 
If you can't find a nail art pen, you can just use black nail polish 
and any utensil with which you can transfer the polish to your nails!
Sketch24015561
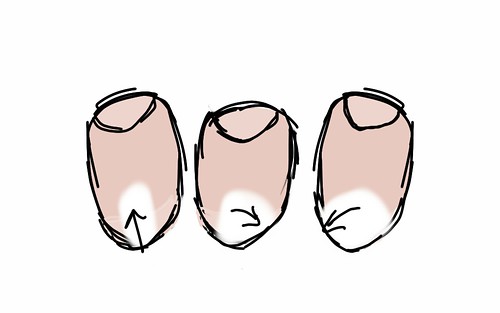
I created the heads of the pandas in three steps. 
One middle stroke upwards, then dragging the polish on either side to make a rounded shape. 
I don't know if this diagram explains it, or if people even need this to be explained.


Here is a GIF I made to demonstrate the painting of the ears, eyes and nose. 
It is not very demonstrative. 
Is it pronounced "jiff" or "giff" (with a hard "G")? 
Because people always say "gif" but I'm pretty sure 
I read somewhere that the original creators of the file format pronounced it "jiff". 
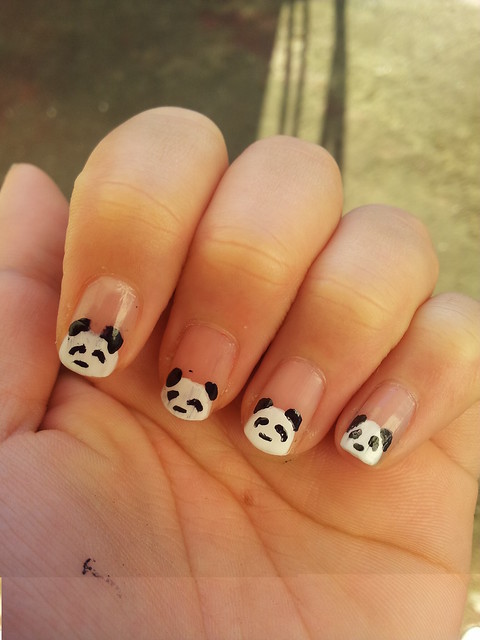
20120624_160020

PANDAS!

Wednesday, April 25, 2012

NOSTALGIA IN A FRAME: A DIY PROJECT

Does everyone keep their old children's books, or is that just me? I still love all of my picture books and every few years I like to go through them and just let myself drown in a wave of nostalgia. I've always wanted to do this DIY project and decorate my room with my favourite illustrations and now I've finally mustered up the energy to do another of my patented (So Easy It Shouldn't Even Count As) DIY Projects!

tumblr_lq9qu2gF7s1qhqqnho2_500

First, find a page from a book that you really like. I chose this page from a Princess & The Pea book that I have, because I really like the detail and all the different fabric patterns.

P1010765-tiltshift-tiltshift

Get a frame around the same size as your torn/cut out page (or vice versa, if you already have a frame). I bought this cheapo one from Ikea, the haven of cheap household shit.

P1010775

If your picture is too big, cut it down to size. Alternatively, if it's too small, you can overlay some card or paper to make it fit into your frame.

P1010777-tiltshift-tiltshift

Then put it all together and let the whimsical times begin! Don't forget to display it next to your lewd lamp (penis switch, tee hee) for extra juxtaposition.

Thursday, February 9, 2012

DIY DECORATIVE COLLAR

P2080690

FACT: Procrastinating over a university assessment late at night is the most conducive environment to DIY crafting. As a bona fide Chipster, I love collars, and I noticed that they are selling them by themselves in all the stores now (for like $10+!!!), so I decided to make my own. It is SO RIDICULOUSLY EASY. I think I will rename my blog "Home of the Way Too Easy DIY Projects".

P2070662

First, all you'll need is any old collared shirt in the colour/print of your choice. Check thrift stores for cheap ones, especially in the men's section.

P2070663

Cut just outside the seam along the collar (not at the part where it folds over).

P2070666

Using fabric paint/pen or a sharpie colour in the tips of the collar.

P2070671

You can use real glitter, but I didn't have any so I just used glittery nail polish to paint over the tips.

P2070672

P2070676

Then I just added some stripes for fun. And that's it! Super easy and now you can wear your collar with jumpers (sweaters) and dresses, or to class up a bikini - whatever! Other things you could use to decorate your collars - polka dots, studs, stickers, or brooches.

Thanks for visiting!

Friday, December 16, 2011

CHALKBOARD BAUBLES

I promise this isn't a Christmas blog, but it's that time of year and my boyfriend just got his pre-order of that new Star Wars game, so I don't have anything else to do but Christmas DIYs! It seems that the only DIYs I can do are ridiculously easy ones (see Bolo DIY).

Things you will need:
- Blackboard paint
- Paintbrush
- Baubles
- Yup, that's it.

photo 2photo 4
Rob bought me this blackboard paint for my birthday or for Christmas, or maybe not even for a special occasion. Lay down some newspaper, wet your brush in some water and paint over the surface of the bauble. Don't worry if it's streaky, you will have to do at least two layers anyway.
photo 1photo 3
You could probably let the baubles dry more effectively by hanging them somewhere, but I just put them out to dry on newspaper. What this means is that the side that is sitting on the newspaper won't dry properly, but you can fix this up with a second coat. Leave the paint to dry for two hours before a second coat.
photo 5
photo 2
My baubles look streaky because I only applied one coat.

photo 5photo 4
Other things to do with blackboard paint! Labels on jars! And this adorable piggy bank (which I didn't paint).

Thursday, December 15, 2011

HOLY SHIT, I LOVE CHRISTMAS

Seriously, Christmas is my favourite holiday. I love it better than birthdays and anniversaries. I love it a million times more than New Years (I loathe New Years, it is a sad, sad time).

photo 4

I am becoming obsessive about the upcoming Christmas party my boyfriend and I are throwing. I have never hosted a proper party before. I think spent about 20 hours sourcing red and white paper straws (ended up getting them here). Just as many hours were occupied making red and white pom poms. And the other day, I purchased a pack of doilies, one of the most versatile of DIY materials.

photo 1
You can use little paper doilies as gift labels! They really help to cover up a shoddy wrapping job. Where do people learn to wrap gifts? My way of wrapping is to make 5 sides of the box look decent, but if you turn it over, a giant mess of scrunched paper and masking tape will be revealed.

photo 2
Or thread some wool/string through and use them to decorate your tree! I don't have a tree this year, so I've just hung my doilies around my room.

photo 3
Also, I bought this one big crocheted doily. I have no idea what I'm going to do with it yet. Maybe it can be part of a table centerpiece?

I know my boyfriend bought me a camera for Christmas, so in two weeks I will be able to take pretty pictures for this blog, including pictures of the party! I haven't even started to plan what food I am going to serve, I've been too obsessed with making the event appropriately chipster.

Monday, December 5, 2011

DIY BOLO TIE

bolo
Fair warning - this is not much of a DIY. It involves absolutely no skill whatsoever, unless you count shopping as a skill (which, come to think of it, I do).
blogDIYbolo 003blogDIYbolo 002
Bolo ties have been touted at the next big thing for the young and the hip for a couple years now, so of course, as a chipster, I must jump straight onto the metaphorical bandwagon. However, living in Australia means that bolo ties aren't readily available in the nearest souvenir store, so I decided to DIY one.
blogDIYbolo 005
Luckily, I had this cow skull pendant lying around already, which makes the whole thing a bit easier, because it has ready-made holes through which to thread the leather. Other things you could use include any trinkets, corks, buttons, brooches, large beads or keyrings. Pendants are especially good because they usually have a little hole that you can thread your leather/string through.
blogDIYbolo 004blogDIYbolo 007
Through the pendant, I threaded a long piece of brown leather thonging, which I bought for a dollar from one of those random stall cart things in the middle of a shopping mall. Real bolo ties use leather rope, or you could use wool, or braided thread, or anything long and stringy. If there is nothing to thread through, you are going to have to use glue or tape to attach the string.
blogDIYbolo 008blogDIYbolo 009
At the ends, I tied on two grey beads, which I just had lying around the house.
blogDIYbolo 001
See, nothing to it.

If you want a more substantial bolo DIY (that requires actual skill), check out Honestly WTF's tutorial. That chick is a DIY queen.

Friday, December 2, 2011

A VERY DIY CHRISTMAS

wreath pompoms
bunting2
For some reason, I seem to have a lot more free time this holiday season, so I've decided to go all out and DIY all my Christmas decorations. It's only the first day of December, and I have already made a paper wreath, some pom poms (for the tree, which I will not be DIY-ing) and paper bunting. Tutorials to come! I haven't decided if I will photograph or illustrate the instructions, because (as you can see) I don't have a very good camera at the mo - just my old iPhone.